Your Turnitin license is designed around empowering your organization to take control of plagiarism. You have access to an intuitive Similarity Report, providing text matches and an indicative similarity score. With a seamless integration with Moodle, your Turnitin license can easily be incorporated into your institutions academic integrity strategy.
Step 1 - Downloading the plugin
The Turnitin Integrity plugin is available directly from the Moodle plugin directory and is installed in the same way you would install any other Moodle plugin.
If the plugin is removed from your LMS, you will not be able to regain access to any old submissions or reports.
Part 1 - Download
The plugin can be downloaded directly from the Moodle Plugin Directory. Keep an eye on our release notes page to know when you can install our latest updates. Every Moodle release is clearly flagged, updates to the admin tools are relevant to all administrator users.
Latest plugin release date: 2023-06-29 - v2023062901
Part 2 - Install the plugin in Moodle
You install the plugin exactly like you would any other plugin in Moodle. Check out their guidance to learn how.
Step 2 - Setting up in Turnitin
Creating an API scope and key
You must create a separate scope and key for every integration you create. If you have various environments in your organization, such as a development or sandbox environment, create a Scope for each of them.
Give each scope a unique name to easily identify it at a later date i.e. 'University of Turnitin Sandbox'.
- From the administrator area, select the
 Integrations tab. In this area, you'll find all of the current integrations active on the account.
 - To set up a new integration, select the Generate API Scope button in the top right.
- Name your integration and select Next.
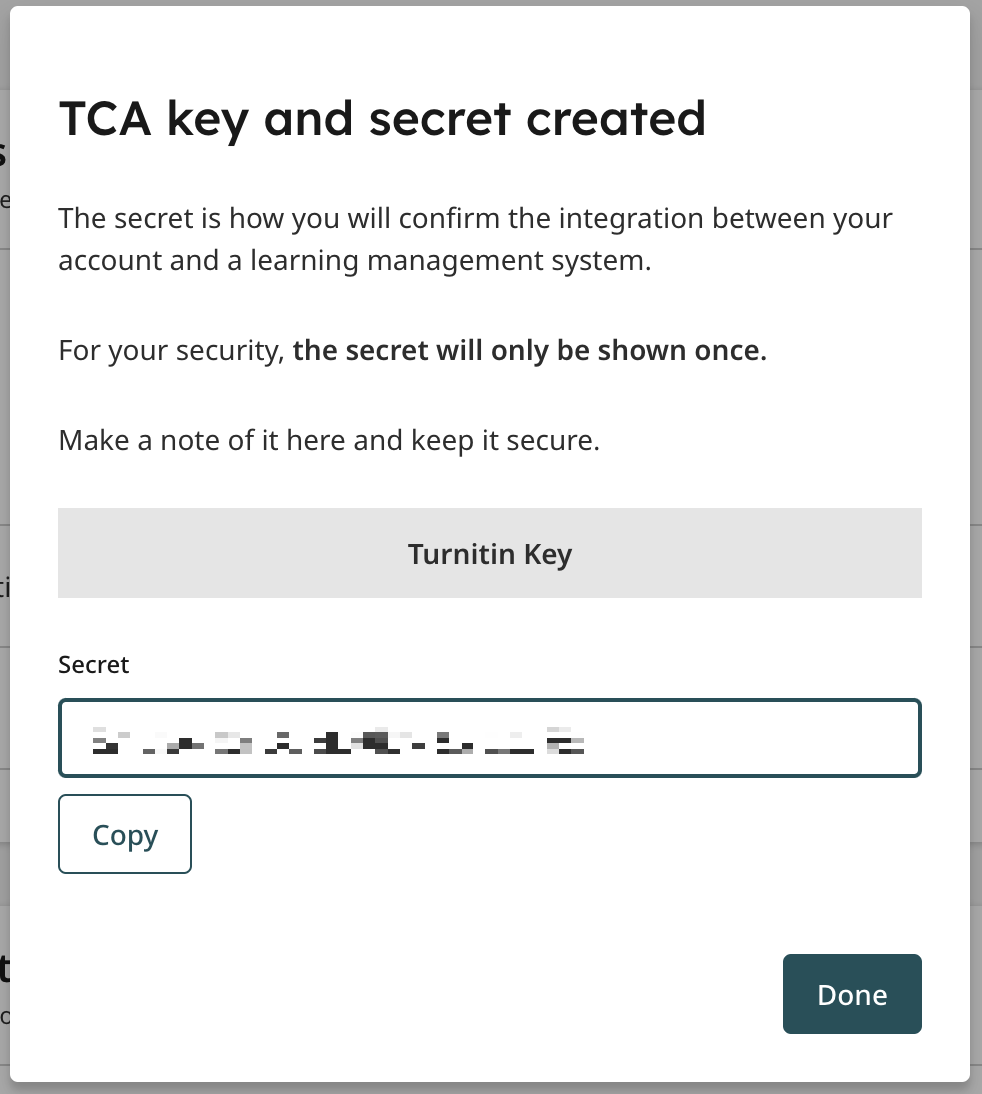
- Name your API Key and select Create and View. Another modal will appear confirming the creation of your key.
Your API key is presented in the form of a ‘Secret’. This string of alphanumeric characters is unique to your institution. You will need this ‘Secret’ to finish setting up your integration in your LMS. You will not be able to access your ‘Secret’ again so please make a note of it now
Managing existing setups
You can create multiple keys for your scope. To create more keys, select Create New Key to the right of your scope.
Once your scope has a key or keys, you can view them by selecting the arrow to the left of your scope.
You can change the status of your key using the switch.
If you turn the status of your key to ‘Off’, then you will no longer be able to set up an integration with this key. Any existing integrations using this key will no longer work while this key remains disabled.
Select the trash can to permanently delete a key.
Once you have deleted your key you cannot restore it. Any integrations you have set up using this key will no longer work.
Step 3 - Configuring an integration in Moodle
This version of Turnitin only works with Moodle 3.5 and above.
- Log in to Moodle as an Administrator.
- Navigate to the Administration side-panel and find the Plugins option.
- From Plugins, find the Plagiarism option.
- Select the Turnitin Integrity plugin link.
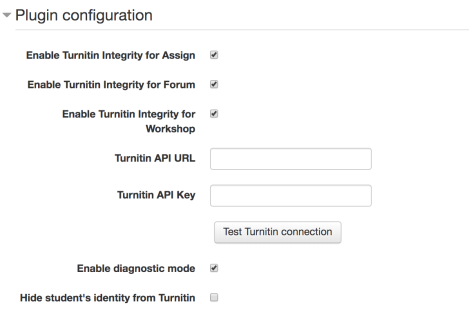
- There are several options on this page, but to get started you'll need to add the API URL and API Key
API URL: The API URL is created by Turnitin for your organization, this is different for everyone. It will be in the format of https://[your institution].turnitin.com/api
For the University of Turnitin it would be https://universityofturnitin.turnitin.com/api
You must include the 'https://' part of the URL or the configuration won't work.
API Key: This is the long number you created in the previous step. This is a unique number to your integration so make sure you don't share it!
Use the Test connection to Turnitin button to make sure everything works.
- There are several extra options on this page you choose on this page.
Enable Turnitin Integrity for Assign - Allows you to use Turnitin with ordinary Moodle Assignments
Enable Turnitin Integrity for Forum - Allows you to use Turnitin with forum posts
Enable Turnitin Integrity for Workshop - Allows you to use Turnitin with Moodle Workshops
Enable Diagnostic Mode - Turns on a mode that will produce more verbose system logs that can be used for diagnostic purposes
Hide Student's Identity from Turnitin - Student names will be anonymized within the Turnitin database.
- You're all done, select the Save Changes button to save your configuration.
After configuration, a summary box will appear detailing all the relevant information for your new integration. This includes the search repositories currently used by your organization and any exclusion options that have been set. You can change these details in the next step.
Step 4 - Changing default account settings
- Log in to Moodle as an Administrator.
- Navigate to the Administration side-panel and find the Plugins option.
- From Plugins, find the Plagiarism option.
- Select the Turnitin Integrity plagiarism plugin link.
- From the Turnitin Integrityplagiarism plugin, select the Default Settings tab.
- Firstly, select the Enable Turnitin checkbox.
These are the default settings for the account. Select this check box if you want every assignment to generate a similarity report.
- There are several optional settings that you can now edit. This will alter the default settings for any assignments you create.
 Learn more about submission options
 Immediately: The similarity report will be generated as soon as a file is uploaded.
Immediately and regenerate on due date: A similarity report will be generated after a file is uploaded and then we will regenerate it on the due date. This is useful when looking for collusion within a group.
Due date: Files will only receive a similarity report on the due date of the assignment.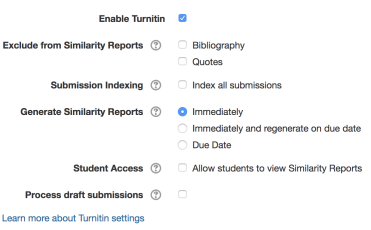
Student Access - This setting determines if students are able to see the similarity reports that are generated.
Process draft submissions - Use draft submissions? This setting will allow similarity reports to be generated for each draft of a submission.
Exclude from Similarity Reports - Allows you to automatically exclude bibliographies and quotes from the similarity reports.
Generate Similarity Reports - This option will determine the time between an upload and when a similarity report will be generated.
Submission Indexing - This option will add files automatically to your organization's private repository. This makes them available to be matched against in similarity reports by other people within your organization.
- Select viewer permissions that align best with your institution's privacy policy. You can choose to:
Allow instructors within your institution to view the full text of submissions for internal matches
When an inter-institution match occurs, instructors can view the full text of the submission automatically.
Allow instructors within your institution to view submission information for internal matches
Basic information about the matching paper will be provided when a match occurs within the same institution.
Save viewer changes
Any changes to the Similarity Report, such as excluding content, will be saved after closing the viewer. For example, if a similarity score reduces from 80% to 70% after excluding the bibliography, the filter will remain in place after closing the viewer and 70% will be the new score.
- All done? Select the Save changes button.
Was this page helpful?
We're sorry to hear that.
