Your Turnitin guidance is moving!
We’re migrating our content to a new help center. We plan to fully launch this new site in July. We are making changes to our structure that will help with discoverability and content searching. You can preview the new site now. To help you get up to speed with the new guidance structure, please visit our orientation page .
Creating an assignment
Getting started
Choose your Learning Management System (LMS) in the tabs below to see how to start setting up your Turnitin LTI assignment within your LMS. Then, continue on to the sections below to finish creating your assignment in the LTI tool.
- Log in to Blackboard.
- Select Courses in the side panel. Your courses will appear in the middle of your screen.
- From your list of courses, select the one you'd like to create an assignment for.
- When the course homepage opens, click Content in the left sidebar.
- Now, click on Build Content in the header. A list of options will open.
- Select your Turnitin LTI tool from your list of options. As soon as you do that, the LTI tool will begin loading.
- Once the LTI tool has loaded, you'll see the General Setting section for the assignment you're creating.
- Continue on to the sections below to see how to finish creating your assignment.
- Log in to D2L (Brightspace).
- Open the course where you'd like to create your assignment.
- Open the Content tab.
- Either choose an existing module or click Add a module and enter a name.
- Once you've chosen or added your module, click Add Existing Activities. A menu will pop up.
- From the menu, select the remote plugin name your administrator gave the Turnitin LTI tool. As soon as you do that, the LTI tool will begin loading.
- Once the LTI tool has loaded, you'll see the General Setting section for the assignment you're creating.
- Continue on to the sections below to see how to finish creating your assignment.
Don't panic if you don't see any students listed in your inbox when the LTI tool opens! Because of the way D2L interacts with LTI tools, students won't show up as part of your class in your LTI assignment inbox until they have submitted work to the assignment.
- Log in to Schoology.
- Select Courses from the top menu. Your courses will drop down from the top of the screen.
- From your list of courses, select the one you'd like to create an assignment for.
- When the course homepage opens, select the Add Materials drop down below the course title.
- Now, select Add File/Link/External Tool, then External Tool.
- Select your Turnitin LTI tool from your Tool Provider drop down. Enter the Title and when you are happy, select Submit.
- Your newly created assignment will be added to the assignment list. Select the assignment to launch the Turnitin LTI Inbox.
- Once the LTI tool has loaded, you'll see the settings cog for the assignment you're creating. This will allow you to edit the Turnitin settings for the assignment.
- Continue on to the sections below to see how to finish creating your assignment.
Creating your General Settings
After completing the initial assignment setup in your LMS, (see the Getting Started section above), the LTI tool will launch and take you to the General Settings section for the assignment you're creating.
- In General Settings, first, type the Assignment name you'd like students to see.
- (Optional) Next, in the Instructions box, you can type any guidelines you want students to have to help them craft their submissions (2,000 character limit).
- Under Start Date, pick the date and time you when you want students to be able to start submitting work. Students will only be able to submit once the start date and time have passed.
- Then, under Due Date, pick the date and time by which students will have to have turned in their work.
- Once you've picked your General Settings, click the Create Assignment button. Here's what happens after you click that button:
- The assignment you just created and General Settings you just picked will be saved.
- Students and instructors who have already been added to the course will be able to see the assignment (but student won't be able to upload a submission to it until the start date has passed).
- You will be taken out of the General Settings panel and to the list of assignments or modules for this course that includes the assignment you just created.
- Now, it's time to set your Similarity Settings. See the next section on this guide for how to do that.
Choosing Similarity Settings
In case you missed it in the Creating General Settings section above, to be able to choose your Similarity Settings, you have to first save your General Settings, which takes you out of the assignment settings and back to the list of the assignment or modules for the course.
-
From your list of assignments or modules, click on the assignment you just created. This will take you back into the LTI tool and to the inbox for that assignment.
- In the assignment inbox, select the gear icon in the top right corner. This will take you back to the General Settings tab of your assignment settings.
-
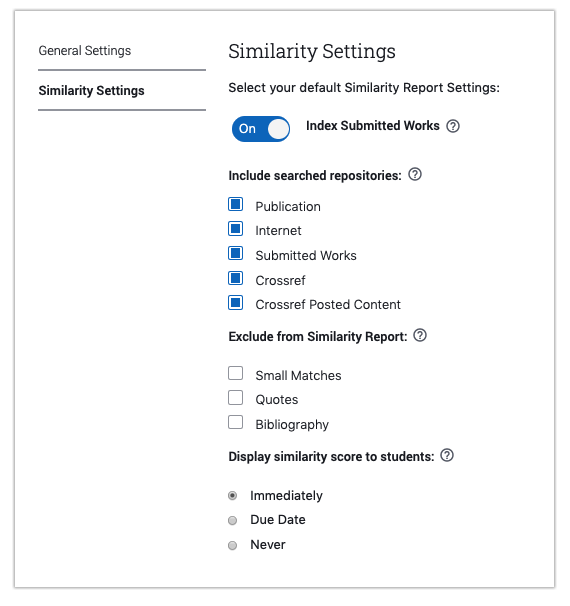
Select Similarity Settings from the settings sidebar. This takes you to the Similarity Settings tab of your assignment settings panel.
-
For the Index Submitted Works toggle setting, you may or may not be able to move the toggle and change this setting based on what you administrator has chosen.
If your toggle is movable...
If your toggle is not movable...
- Keep it ON to add submissions made to this assignment to the repository or repositories of submitted works that your institution checks for similarity.
OR - Flip it OFF if you do not want to add submissions to any repositories.
You cannot choose or change this setting. Per your administrator, all submissions will be added to the repository or repositories of submitted works that your institution checks for similarity.
- Keep it ON to add submissions made to this assignment to the repository or repositories of submitted works that your institution checks for similarity.
- Under Include searched repositories, select the box next to each repository that you would like Turnitin to check for similarity. Turnitin will check submissions made to this assignment against every paper, article, website, etc. in the repositories you select.
-
Next, under Exclude from Similarity Report, select the box next to the parts of a submission that you want Turnitin to ignore as it checks for similarity. Turnitin will skip over these aspects in all submission made to this assignment as it checks for similarity.
It's recommended that you choose to have Turnitin ignore the Bibliographies and Quotes in submissions as it searches for similarity. Bibliography pages and quoted text often look the same in submissions that are about similar topics.
- Under Display similarity score to students, decide when you'd like students to be able to see their similarity score and access their Similarity Report for this assignment.
Selecting the Immediately option will allow students to access their reports as soon as they are generated.
- Selecting Due Date will only allow students to access their reports after the assignment due date has passed.
- Selecting Never means you will see students' reports, but students will not.
- The Student Resubmission toggle will allow students to resubmit to the assignment an unlimited about of times when On. Only the student's most recent submission will be shown within the inbox and previous submissions will be inaccessible. Set this toggle to Off if your students are to only submit once.
- When you're happy with the settings you've chosen, select Save Settings.

Was this page helpful?
We're sorry to hear that.
