User management settings will only affect users within your web-based Turnitin instance. The settings on this page will have no affect on users in your LMS.
Don't need to add users in bulk? Learn how to add users individually.
To add users select Users from the sidebar and then select the + Add User button.
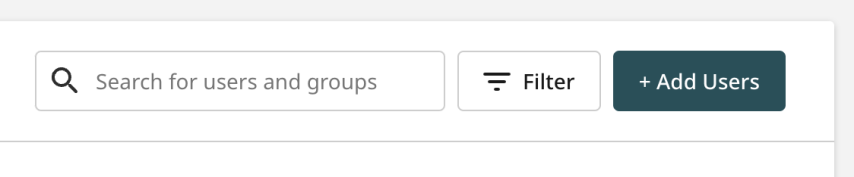
To upload a list of users select the  Upload List button.

Upload the .csv file by dragging the file onto the upload area or use the Select File button to locate the list on your device.
The file must be a CSV file type and must not include more than 1,000 users. You can download a CSV template from Turnitin to help you create your list by selecting the Download Empty CSV Template button.
Filling out the .csv file
If you are using the template provided by Turnitin, do not remove the headers in line 1.
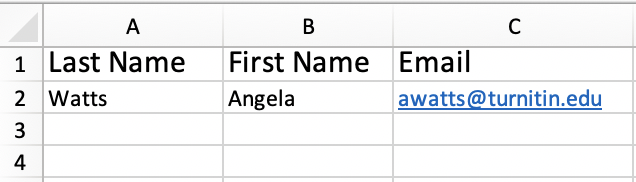
If you are creating a .csv file yourself, make sure you include the following headers in line 1.

The order of these headers is important. They must be in the correct order or Turnitin will not accept the file.
The first four columns will always be the same:
- Column A - Last Name
- Column B - First Name
- Column C - Email
- Column D - Account Administration Role
- Enter 'yes' or 'no'
If you have Turnitin Originality:
- Column E - Authorship Role (Turnitin Originality only)
- Enter 'admin', 'user', 'investigator', or 'no access'
- Column F - Product Role
- Enter 'admin', 'user', 'instructor', or 'no access'
If you have Turnitin Similarity or SimCheck:
- Column E - Product Role
- Enter 'admin', 'user', 'instructor', or 'no access'
The Product Role depends on your license type.
Basic information
In your spreadsheet, you will need to enter the last name, first name, and email address of the user you wish to add to the account in columns A, B, and C.
This email is where the user will be sent their account activation email. Please make sure it is the correct one.
Roles
Enter the user roles into columns D, E, and F.
It is very important to understand the level of access for each role. We are aware that institutions often have certain levels of authority for who has access to student work across many courses, departments, and schools.
Making a user an Account Administrator means they will have access to account-wide settings, user management, license information, the ability to lookup paper’s within the institution. This role will have access to all user details, as well as the ability to view all your institution's submissions.
Product Admin users will have access to product settings within the specified product. Admins will also have access to all the functionality that the Investigator, Instructor, and User roles has.
Investigator is an Authorship capability role and will have access to the My Reports area where they can create and view Authorship Reports (Turnitin Originality only).
Instructor users will be able to manage folders, upload files for similarity checking, and view Similarity Reports.
The User role will have access to the My Files (and My Reports if on Turnitin Originality) area where they can create and view Similarity Reports and Authorship Reports (Turnitin Originality only).
All four of the above user types will have access to Turnitin’s AI writing detection capabilities from within the Similarity Report.
We do not recommend allowing students to have access to this functionality. If your account has students set up as the ‘User’ user type, we recommend that you implement the direct submission feature to avoid students having access to the AI writing report.
There is currently a known issue that prevents Investigators using Turnitin Feedback Studio with Originality from accessing Turnitin’s AI writing detection capabilities when opening the viewer through the Authorship Report. We are working on resolving this issue.
No accessrestricts all access and visibility to the product.
If you would like the user to be an Account Administrator at the highest level, enter yes in column D. If you do not want this user to be an Account Administrator, enter no in column D.
Enter the role you want each user to have in the correct column.

If you have Turnitin Originality, you will need to give each user a role for both Turnitin Originality and Authorship. If you do not, Turnitin will not accept the file.
Once you are happy with the list, save the file.
Upload the file and email invitation
Select the Upload List button and locate the .cvs file on your device. If you select the wrong file, use the trash can to remove it.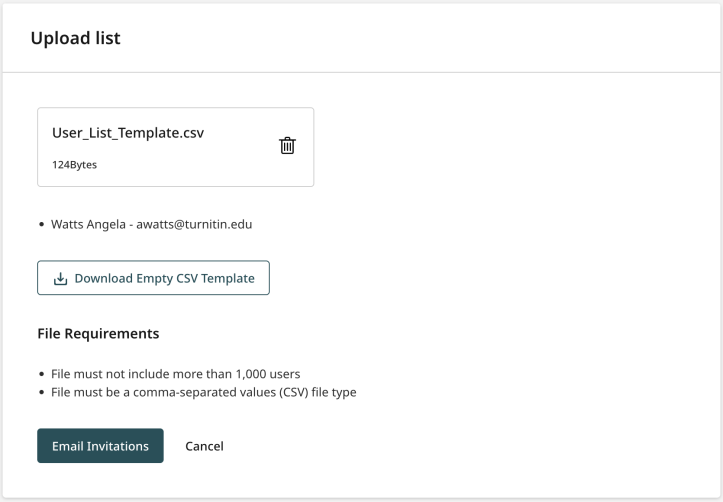
If the .csv file is formatted incorrectly then you will be unable to upload it.
The Email Invitation button will send an invite to the users that you have entered valid details for. It is now up to the user to set up their account.
The Cancel button will take you back to the Users list. You will lose all the details you have entered so far.
Was this page helpful?
We're sorry to hear that.
