Step 3 - Linking roster files
In the previous step, you created a connection between Turnitin and your student information system using SFTP. Now, we'll use that connection to receive your roster file. Once we've received your roster file, we will start to link them to a Turnitin account.
When first accessing this page, you may see a troubleshooting message. This message appears if we have not yet received a roster file from you. The most common cause of this message showing is that the schedule you created for syncing with Turnitin has not yet passed. If your student information system allows you to 'force' the file, this will immediately allow you to continue. Otherwise, you can return to this page once the scheduled time has passed to proceed.
Check out our full troubleshooting guide if the scheduled time has passed and you still see this message.
- Navigate to the roster tab.
- Use the Next button to move to the Link Roster Organizations step. If you've successfully made a connection between your student information system and Turnitin, a list of roster organizations we received from your roster file will appear here.
- For each roster organization you have sent, you can link to a different Turnitin account. You can create new sub-accounts for each organization to better reflect your roster. Multiple roster organizations can be assigned to a single Turnitin account.
-
The information in the Roster Organizations column is set within your student information system. This could be as wide as splitting up entire schools or as focused as separating different departments within a single institution.
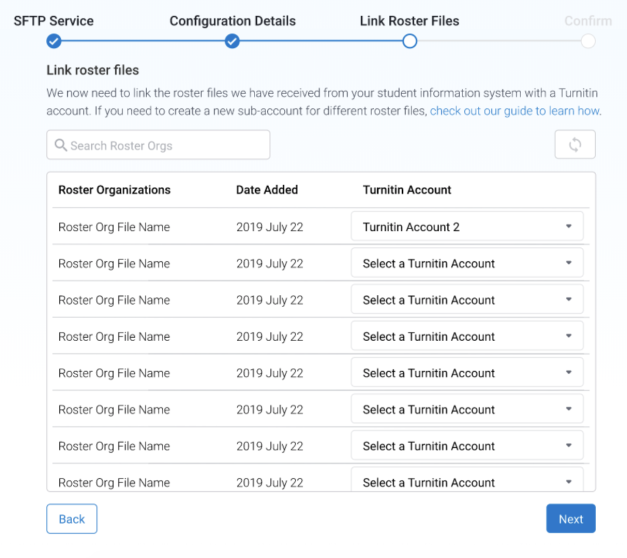
- Use the drop-down list to select the Turnitin account you'd like to link with the roster organization. Continue until you have linked all roster organizations that have a Turnitin license.
-
Not all roster organizations supplied in your roster file have to be linked.
Once linked, any classes, users, or enrollments created via roster sync will be unable to be edited in Turnitin. All changes must be made within your student information system to help prevent the data becoming de-synced.
- Use the Next button to continue. You'll review your choices in the next step.
Was this page helpful?
We're sorry to hear that.
