If you have received a welcome email from Turnitin, this confirms that your Turnitin account is now ready to use, or you have been added as an administrator by a top-level administrator within your institution, and can now access the Turnitin service.
If you are a Turnitin administrator and believe that you should have received a welcome email from Turnitin, please check your spam or junk folder. Alternatively, contact your sales representative or top-level administrator, who can resend this email or your check that your email address has been typed correctly.
- Click the Get Started button from your Turnitin welcome email.
- To create your password, enter your email address (this must be the same email address to which your Turnitin welcome email was sent), along with your last name or family name.
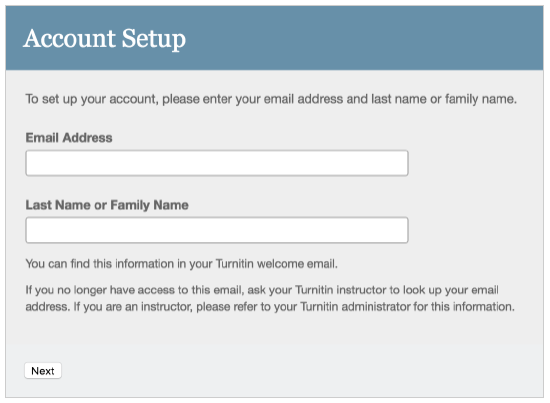
- Click Next to continue.
- Turnitin will send you an email to validate your account, with the subject: Set up your Turnitin Account. Return to your email inbox.
Check your email client's spam or junk folder for this email.
- Follow the instructions in your email to finish setting up your Turnitin account. This will direct you back to Turnitin's account setup pages.
The create password URL contains a unique ID and will expire if you fail to click it within 24 hours. If your create password link is no longer working, click the link under Has your link expired? to request a new email.
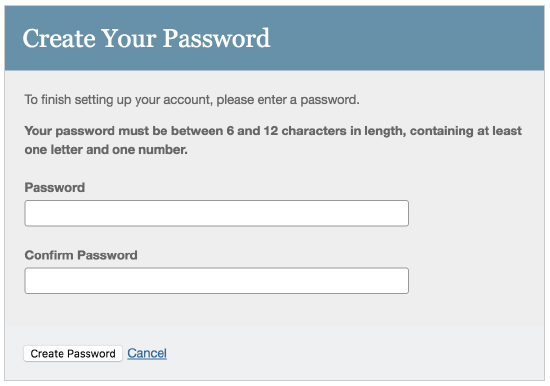
- Enter and confirm your new password. Your password must be between 6 and 12 characters, containing at least one letter and one number.
- Click the Create Password button to finish the account setup process. Alternatively, click Cancel to abort.
- Your account setup is now complete; an email will also be sent to confirm this setup. You can now log in to Turnitin to set your security question and answer and begin using the service.
- Click the Log in Now link.
- Using your email address and newly created password, enter this information in the login fields provided.
- After login, you have the opportunity to amend your name and email address, should any of this information have been entered incorrectly.
- Select a security question, then enter an answer in the fields provided. This will be used in the event that you need to reset your password.

- Click Next to continue.
- Click the I Agree -- Continue button to accept Turnitin's user agreement and enter the Turnitin service. Alternatively, click I Disagree -- Logout.
- (integrations users only) To finalize the setup of your account, you must configure your learning management system integration with Turnitin.
If you are an existing Turnitin user, each Turnitin account must be assigned a unique email address in the Turnitin system. Please skip to logging in guidance if you have already created a Turnitin account. If you are an integrations user, you must configure your Turnitin integration once you have followed the steps below.
Was this page helpful?
We're sorry to hear that.
