Configuring Turnitin in a self-hosted or open-source environment
This guide is for users who are looking to integrate on an Open Source or self-hosted environment. If you use a Canvas hosted environment, switch over to the relevant guide to get started.
If you would like to integrate in a Canvas test or beta environment, switch to the relevant guide.
Before you get started
- Make sure you are on the most recent version of Open Source Canvas.
- Make sure that Deep Linking is enabled in your instance of the most recent version of Open Source Canvas.
- It takes both the Canvas admin and the Turnitin admin to complete this integration. If these are two different people, be sure have them work together so that the integration works.
If the directions below do not reflect what you see in your Open Source Canvas environment, please consult the Open Source Canvas Community for additional guidance.
Initial set-up in Turnitin
- If you are part of a global institution, log in into your Turnitin account via turnitin.com. Alternatively, log in to turnitinuk.com if you are part of a UK institution.
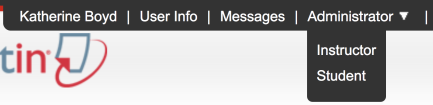
- Ensure that Administrator view is enabled from the drop-down menu at the top of the screen. If Instructor or Student is selected, please change to Administrator.
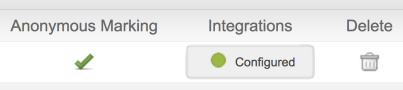
- The Unconfigured or Configured button will appear in the Integrations column on the administrator homepage.
- If an integration has already been configured, select the Configured button and check that all integration details are correct. If you are migrating from another Integration, this button will appear green, but will allow you to configure more integrations.
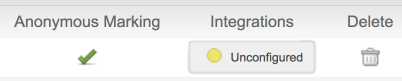
- If you have not configured an integration before, select the Unconfigured button.
If you already have an LTI 1.1 integration set up in your Canvas test/beta environment, be sure to use the same account for your test/beta environment.
If you are unsure which account is already linked to your test/beta environment, as a Canvas admin, please go to Settings then select the Apps tab. Select View App Configurations. Select the gear sign next to your Turnitin LTI 1.1 integration and choose Edit. The Consumer key listed there is the Turnitin account ID you should use.
We also recommend that you rename the Turnitin LTI 1.1 app as it will need to be deleted later.
- If an integration has already been configured, select the Configured button and check that all integration details are correct. If you are migrating from another Integration, this button will appear green, but will allow you to configure more integrations.
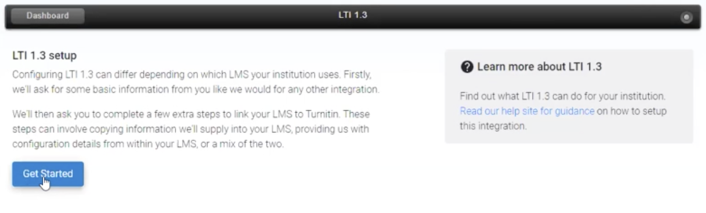
- Select the LTI 1.3 button to open the configuration page.
Unconfigured integrations will have an unlit status button. However, LTI 1.3 Integrations will permanently stay unlit, even after a successful integration.
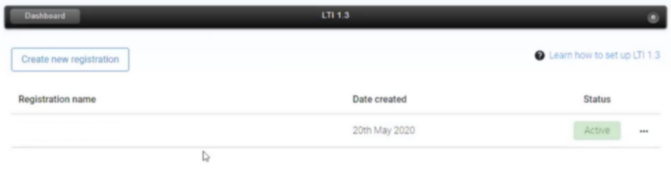
- If this is your first LTI 1.3 registration, review the introduction page to get an idea of what you are about to do. When you're ready, use the Get Started button.
- If you already have a pre-existing registration, select the Create new registration button from the registration dashboard.
- If you already have a pre-existing registration, select the Create new registration button from the registration dashboard.
- For Canvas Open Source environments, select 'Other'.
- Based on your selection, the page will autofill with the information that you need to enter into Canvas Open Source to complete the integration.
- Keep this page open and open a new tab to your Canvas Open Source environment.
Initial set-up in Canvas
-
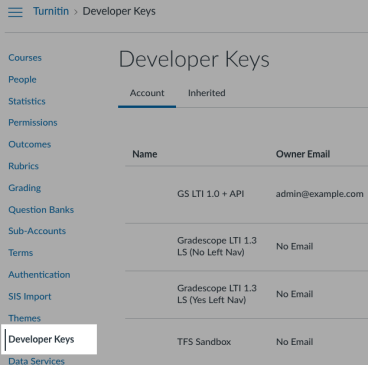
Navigate to the Admin page of your Canvas environment, and then open the Developer Keys section.
-
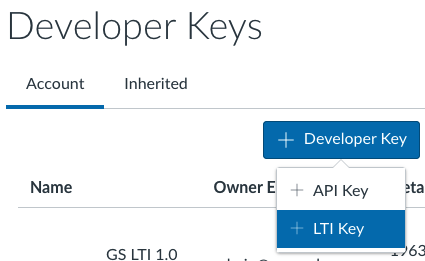
On the Account tab, select the + Developer Key button.
-
From the sub-menu, select the + LTI Key option.
-
A configuration screen will show. Please use the following information to fill out the fields.
Field
Change to
Method Use the drop-down to select Manual entry Key Name Create an identifiable name that will be used in the list of developer keys for your account, e.g. Turnitin Redirect URLs https://lti.int.turnitin.com/launch
Title Assign a name for the integration that Instructors will use to create a new assignment, e.g. Turnitin Description Add any information or notes you'd like to log about the integration. Target Link URL
https://lti.int.turnitin.com/launch/tfs
JWK Method Use the drop-down to select Public JWK URL -
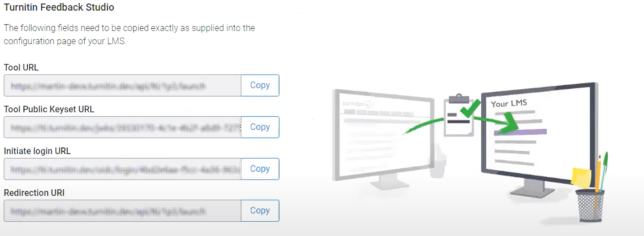
Switch to your Turnitin tab and copy the following fields. Paste them into the appropriate Canvas fields.
Canvas language
Turnitin language
OpenID Connect Initiation URL Login Initiation URL Public JWK URL Tool Public Key set URL
Keep the Turnitin page open once you've set these fields. You'll need it during the next step to add information into Turnitin to complete the connection.
-
Back in Canvas, expand the LTI Advantage Services section. Certain defaults must be set here for the connection to Turnitin to successfully pass the right data. Select the first seven options, and use the table below to ensure you have selected the correct ones.
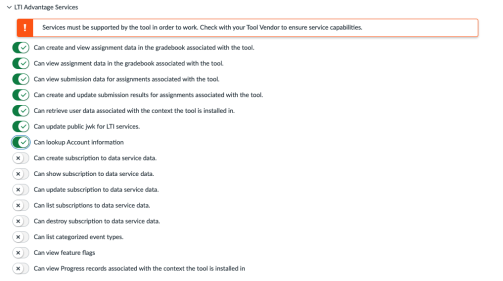
Toggle Option
Correct toggle state
Can create and view assignment data in the gradebook associated with the tool. Active Can view assignment data in the gradebook associated with the tool. Active Can view submission data for assignments associated with the tool. Active
Can create and update submission results for assignments associated with the tool. Active Can retrieve user data associated with the context the tool is installed in. Active Can update public jwk for LTI services. Active
Can lookup Account information
Active
Can create subscription to data service data.
Deactivated
Can show subscription to data service data.
Deactivated
Can update subscription to data service data.
Deactivated
Can list subscriptions to data service data.
Deactivated
Can destroy subscription to data service data.
Deactivated
Can list categorized event types.
Deactivated
Can view feature flags
Deactivated
Can view Progress records associated with the context the tool is installed in
Deactivated
You are now finished with the LTI Advantage Services section and it can be collapsed.
-
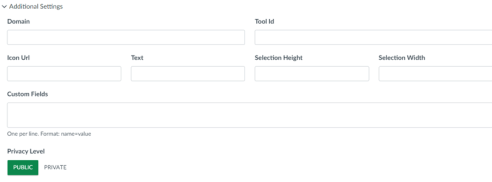
Open the Additional Settings section. In the Domain field, enter turnitin.com. Then change the Privacy Level from Private to Public.
-
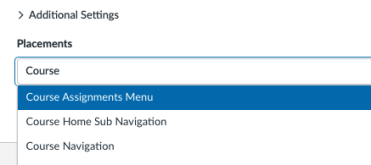
Moving to the Placements section, remove of the default options by selecting the X icon in each of the pills.
-
Select the now empty Placement field, and find the Course Assignments Menu option.
-
On successfully setting the Placement correctly, a new 'Course Assignments Menu' section will appear. Expand this section.
-
From the Course Assignments Menu section, select the LTIDeepLinkingRequest option. All other fields can be left blank.
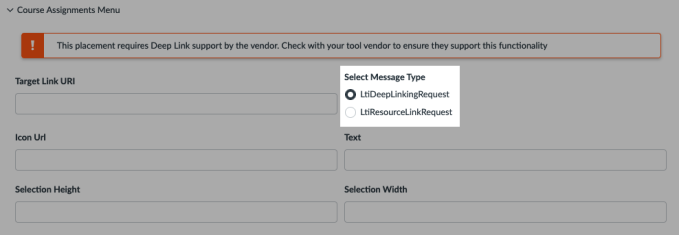
If the DeepLink option is grayed out in your self-hosted Canvas environment, please contact Open Source Canvas Community for additional guidance.
-
Select Save and return to the Developer Keys page.
-
Switch to the Account tab, if it is not already open.

-
Navigate to the LTI Key that you just created. This should be identifiable by the Key Name you gave it.

-
Move the switch for your LTI Key from OFF to ON.
-
You'll be asked to confirm changing the state of the developer key. Select OK to continue.
-
From the Details column, copy the fifteen digit developer key you just activated.
You do not need to use the Show Key button to do this. Simply copy the fifteen digit key.

-
Keep your Canvas Open Source tab open.
Continuing set-up in Turnitin
- Return to the Turnitin configuration page you should still have open.
-
Navigate to the LMS Details section of the Turnitin configuration page and add the following data.
Turnitin field
Change to
Client ID Paste the fifteen digit LTI Key that you previously copied. Platform public key set URL
https://yourcanvasdomain.com/api/lti/security/jwks
Issuer
https://yourcanvasdomain.com
Access token URL
https://yourcanvasdomain.com/login/oauth2/token
OpenID connect login endpoint
https://yourcanvasdomain.com/api/lti/authorize_redirect
Platform authorisation provider Leave blank For example, if your institution’s canvas domain that you created was mycanvasschool.com, then:
- your Platform public key set URL would be https://mycanvasschool.com/api/lti/security/jwks
- the Issuer would be https://mycanvasschool.com
- the Access token URL would be https://mycanvasschool.com/login/oauth2/token
- and the OpenID connect login endpoint would be https://mycanvasschool.com/api/lti/authorize_redirect
-
Use the Save button to complete the configuration process. Next, you'll add the Turnitin App to make it available to Instructors in your environment.
You can only complete this section if you have kept the same Turnitin page open that you used in the Initial Canvas set-up section above. If you have not kept this page open, you will have to start the process again.
Adding the Turnitin App in Canvas
-
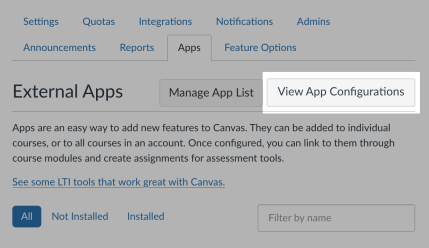
Go back to your Canvas Open Source tab and switch to the Settings section of the Admin page. Then select the Apps tab.
-
Select the View App Configurations button.
If you already have the Turnitin LTI 1.1 integration configured in your Canvas environment, click View App Configurations, then click the Gear icon for that integration and choose Edit from the dropdown. Rename the tool to Turnitin LTI 1.1. We recommend this so that you can tell the two integrations apart. If you are using both the Canvas Plagiarism Framework integration and the LTI 1.1 integration, the LTI 1.1 integration is the only one that can be renamed.
-
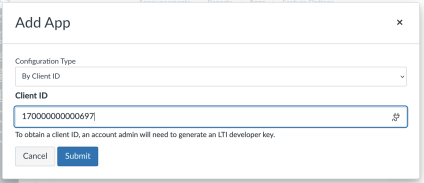
Select the + Add button.
-
Change the Configuration Type to By Client ID.
-
Paste the developer key you copied into the Client ID field.
-
Select the Submit button.
-
You'll be asked to confirm the app installation. Select the Install button to continue.
Creating a dummy assignment
Once you've added the Turnitin app, you need to create a dummy assignment to initialize it with your Turnitin account.
Don't worry, this process will only have to be done once for your account, and this will pre-initialize it for your instructors and students.
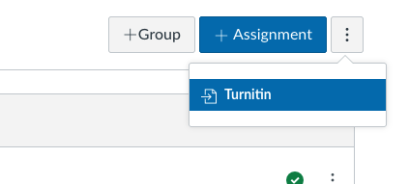
- Navigate to the course where you would like to add Turnitin.
- Select the vertical ellipsis menu icon ⋮ and select Turnitin.
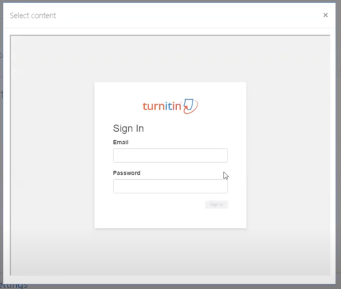
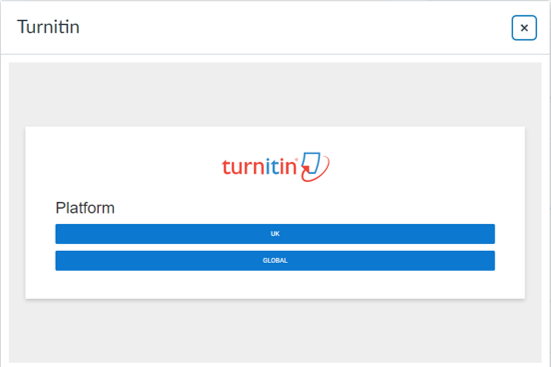
- In the new window there will be an option to connect your account to Turnitin. Choose Global if you are using Turnitin via turnitin.com, choose UK if you are using Turnitin via turnitinuk.com.
- Have the Turnitin Administrator enter the email address and password they use to access turnitin.com. We need this to initially authenticate the registration as genuine.
- Select the relevant account or sub-account for this registration using the radio buttons. Use the Next button to continue.

If you are migrating from LTI 1.1 to LTI 1.3, we recommend that you link to the same account that you used for the LTI 1.1 integration so that you will still have access to those past assignments and submissions with the LTI 1.3 integration.
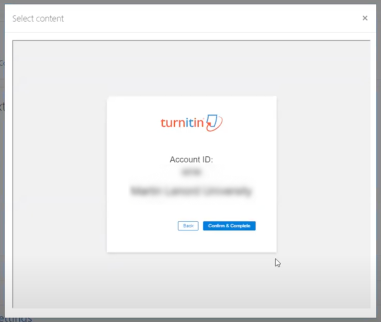
- Review the content on the confirmation screen. If everything looks correct, select the Confirm and Complete button to finish your setup.
- Once you've linked your account and finished creating your assignment, the dummy assignment can be deleted. Your registration has been initialized.
This is a one-time action that needs to be completed by the account administrator in order to allow use of LTI 1.3. Neither your instructors or students will be prompted for this.
If you have the Turnitin LTI 1.1 app installed in Open Source, please delete that app now.
If a Student Information System (SIS) changes a student’s enrollment on an LMS course to either remove them or make them inactive, this could remove the student from the Turnitin assignment. If an institution has concerns around how their SIS may work with Turnitin, they should speak to their LMS provider to learn more about how details are shared with LTI tools.
Was this page helpful?
We're sorry to hear that
Need to contact a human?
Get in touch